Dialog Engine
Botpress uses what we call the Dialog Engine to handle conversations. The Dialog Engine is responsible for every interaction with a bot. It handles the user input and the bot response. But between the two, there's a whole lot happening.
Overview
The Dialog Engine use Flows that represent the overall conversational logic of a bot. A Flow is then composed of Nodes which execute a series of Instructions. Instructions are part of a Node lifecycle and can execute Actions. An Action is code, usually code that you have written yourself, code provided by Botpress or by others (more on that later).
Flows
More complex bots are generally broken down into multiple smaller flows instead of just one, big flow. The reason for breaking down the bot into multiple flows is to ease maintainability and reusability.
Flow Lifecycle
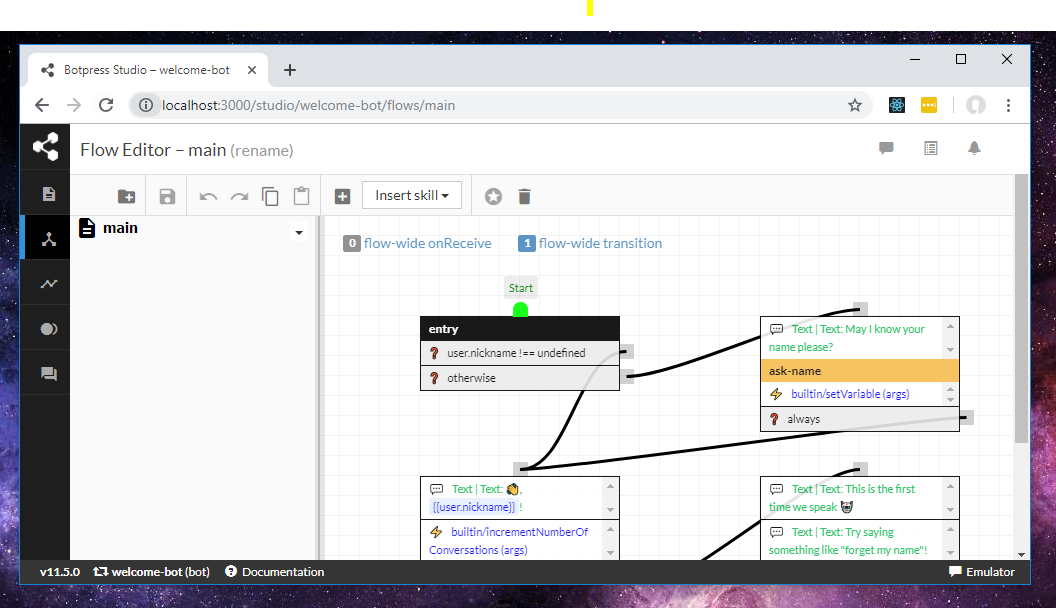
A flow always starts at the startNode of its *.flow.json file. The start node indicates the name of the node on which to start. Once the node is selected, the Dialog Engine will enqueue the instructions of the active node (more on instructions later). Then it will process the instructions sequentially.
The Dialog Engine is event-based and is non-blocking by default, which means that a flow will execute all it can execute until it needs to wait.
Note: There are currently two reasons for a flow to "wait":
- A node is marked as waiting for user input
- A node couldn't match a condition to transition to another node
Once the first node is processed, the Dialog Engine will proceed to the next node in the flow until it reaches the very end. Flows are pretty straight forward. Nodes also have a lifecycle of their own. It is the nodes that do the heavy lifting in a flow. The flow only orchestrates them.
Storage
Flows are stored as JSON files in the bot's source files. In the context of this tutorial, the flows are stored in the data/bots/trivia-bot/flows/ folder. Each flow is split into two files: the logic (*.flow.json) and the visual-specific properties (*.ui.json). The reason to split these is to make easier to maintain and review changes.
*.ui.jsonfiles can almost always be ignored from code reviews as they don't affect the functionality of the bot.*.flow.jsonfiles could also, in theory, be created manually by developers instead of using the GUI. This is the case for Skills, which we will cover later.
Nodes
Nodes are the primary units of the conversational logic of your bot. An active conversation (which we call a "session") always has one and only one active node. A node generally transitions to another node or flow. When it doesn't, the conversation is ended. The next message from the user will then be part of an entirely new session.
A node is separated into three different stages: onEnter (A), onReceive (B) and onNext (C).

Node Lifecycle
onEnter
onEnter is a list of instructions that will be executed when the node is entered. If multiple actions are defined, all of them will be executed sequentially.
onReceive
onReceive is a list of instructions that will be executed when the node receives a message while being the active node. As soon as there is an action defined, the node will automatically be waiting for user input (orange node).
When this property is left unused, the node is non-blocking (black), which means it will flow straight from the onEnter to the onNext.

Flow-wide onReceive
You can define an onReceive instruction that will always be executed before every node's onRecieve.
👓 Examples: Flow-wide On Receive
- Audit Trail: Record specific logs of messages received in the scope of this particular flow
- Authentication Gate: Run some authentication
- Sentiment Analysis: Making sure the sentiment of the conversation is staying healthy
To define new Flow-wide On Receive Actions, navigate to the relevant flow, then double click anywhere on the checkered background to show the Flow Properties Pop up. You can also click on the links in the top left corner of the flow editor. Under the On Receive section, click the Add Action button to add a new action.
onNext
onNext (also called Transitions) is exactly the same thing as Flow-wide Transitions except that the conditions are evaluated only after onReceive or onEnter have been executed.
Special cases: If no condition is defined, the default behavior is that the conversation ends. If there are conditions defined but none match, nothing happens, i.e., the current node stays active, and it will flow when a condition is matched. By default, the
onNextwill only be retried afteronReceiveis re-invoked.
Destination: A Transition always has a target that we call a Destination. It can be:
- A different Node
- A different Flow
- The previous Flow (see Flow Stacks)
- Itself (Loop back on itself)
- The end of the conversation
Flow-wide onNext
A Flow-wide onNext instruction allow you to override node transitions when the condition is successful.
👓 Examples: Flow-wide onNext
- Authentication Gate: Re-route the user to the login flow if they are not authenticated
- Sentiment Analysis: Re-route the user to the human fallback node if the conversation is degrading
- Matching flow-wide intents such as "
cancel" etc..
State
Each conversation has a State associated with it. The state is created when the conversation session is started and is destroyed when the session is ended.
In the context of this tutorial, this means that a state is created just before the "entry" node is entered and just after the "over" node is executed.

Note: The state is global to the conversation, so if the conversation spans multiple flows, the state is shared for all the flows.
Session Timeout
When the Dialog Engine is waiting for the input of an inactive user, after a while the session will Timeout. Timeout allows you to end the conversation gracefully, if need be. It can also be useful to do some processing before deleting the session. For instance, you could save the user contact information to an external database, or tell the user how to contact you, or inform the user his session has timed out.
Timeout Flow
You can use a Timeout Flow to handle your timeout logic. It works just like a regular flow. All you have to do is to add a Flow called timeout.flow.json to your bot and specify a start node. The Dialog Engine will detect your Timeout Flow next time a user times out.
Timeout Node
Very similar to the Timeout Flow, the Timeout Node should be called timeout and should belong to the current flow. You don't have to link it to any other node. The Dialog Engine will detect the node based on its name.
Timeout Transition
Another option that requires some coding is to add the property timeoutNode to your *.flow.json file and assign it to name of the node that should handle the timeout. It can be any node, it doesn't need to be called a particular way.
⚠ Important: Once the Dialog Engine has processed the timeout, it will delete the session.
Actions
An Action is JavaScript code that is executed in a Node.js VM. It can be anything you want. Call an API, store something in the database or store something in the Key-value Store. Actions are called by onEnter and onReceive instructions. There are two types of Actions:
- Script: A user defined Action that is used to run custom code.
- Output: An output Action that is used to make a bot output something.
To learn more on Actions, please refer to the Custom Code section.
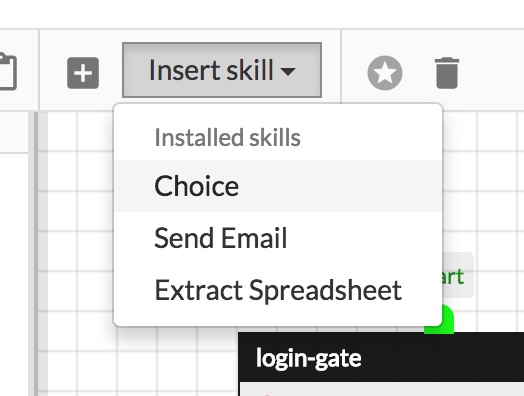
Skills
After building a couple of flows/bots, you'll quickly notice that there are some common patterns that you find yourself implementing over and over. Skills come to the rescue.
Skills are higher-level abstractions on top of flows. In fact, skills are dynamic flow generators.
They can be seen as reusable components between multiple flows or even multiple bots.
Installing skills
Every skills must be exposed by a module. Modules can host any number of skills. All you need to do is install the required module and you will have access to its skills.
Using skills
Skills are meant to be used by the Botpress Flows GUI. After installing a skill module, navigate to a flow in the Graphical Flows Editor, then locate the "Insert Skill" dropdown in the top toolbar:
After filling in the form, you'll be able to click anywhere in the flow to insert the skill to be consumed by the other nodes.
Persistence
Skills are stored as flows under the data/bots/your-bot/flows/skills folder.
You can also visualize the generated skills from the GUI:

Editing skills
Once a skill node has been generated, you may click on that node and click "Edit" on the left panel to edit that node, which will update the generated flow automatically behind the scenes.
