| Developers Guide

| Developers Guide

  • Docs
  • API
  • Help
  • Blog

›Tutorials

Notes on Versions Released

  • Migrating & Updating
  • Updating to New Releases

Getting Started

  • Introduction
  • Installation
  • Quick Start

Main Concepts

  • Overview
  • Glossary
  • CMS
  • Dialog Engine
  • Actions & Hooks
  • Memory
  • Modules
  • NLU
  • Emulator

Advanced Guides

  • Debug
  • Configuration
  • Authentication Methods
  • Custom Module
  • Performances
  • Hosting
  • Version Control
  • Development Pipelines
  • Clustering

Channels

  • Website Embedding
  • Facebook Messenger
  • Telegram
  • Microsoft Teams
  • Converse API
  • Slack
  • Smooch (Sunshine Conversations)
  • FAQ

Tutorials

  • Deploying a cluster on Digital Ocean
  • How to act on an intent
  • Acting Proactively
  • Using Carousel Postback
  • How to use Slot Skill
  • How to use Call API Skill
  • Calling an API in a Custom Action
  • Shortlinks
  • Connecting your bot with your existing backend
  • Supported databases
  • Timeouts
  • Human in the loop
  • Jump To
  • Inter-bot Communication / Delegation
  • Contextual FAQ
  • Authenticate a user against a 3rd Party OAuth
  • Listening for file changes
  • Using a 3rd party NLU
  • Using the UiPath integration for Botpress

Pro Edition

  • About
  • Licensing
  • Configuring RBAC
  • Monitoring & Alerting
  • Bot Pipelines
  • Internationalization

Contextual FAQ

Create a context

To create context, you have two options:

  • Create context specific to a bot, create or edit this file data/bots/<your_bot>/config/qna.json.
  • Create context specific to all bots, create or edit this file data/global/config/qna.json.

Then append the name of your new contexts to qnaCategories like so:

{
  "$schema": "../../../assets/modules/qna/config.schema.json",
  "qnaCategories": "global,monkeys,giraffes"
}

From version 12.8 onwards

Contexts listed in the dropdown menu are sourced from all your existing content (questions & NLU intents). The qna.json configuration file is no longer used to provide a list of contexts. To create a new context, open or add a Q&A, input the context in the Contexts field, then select + Create context:
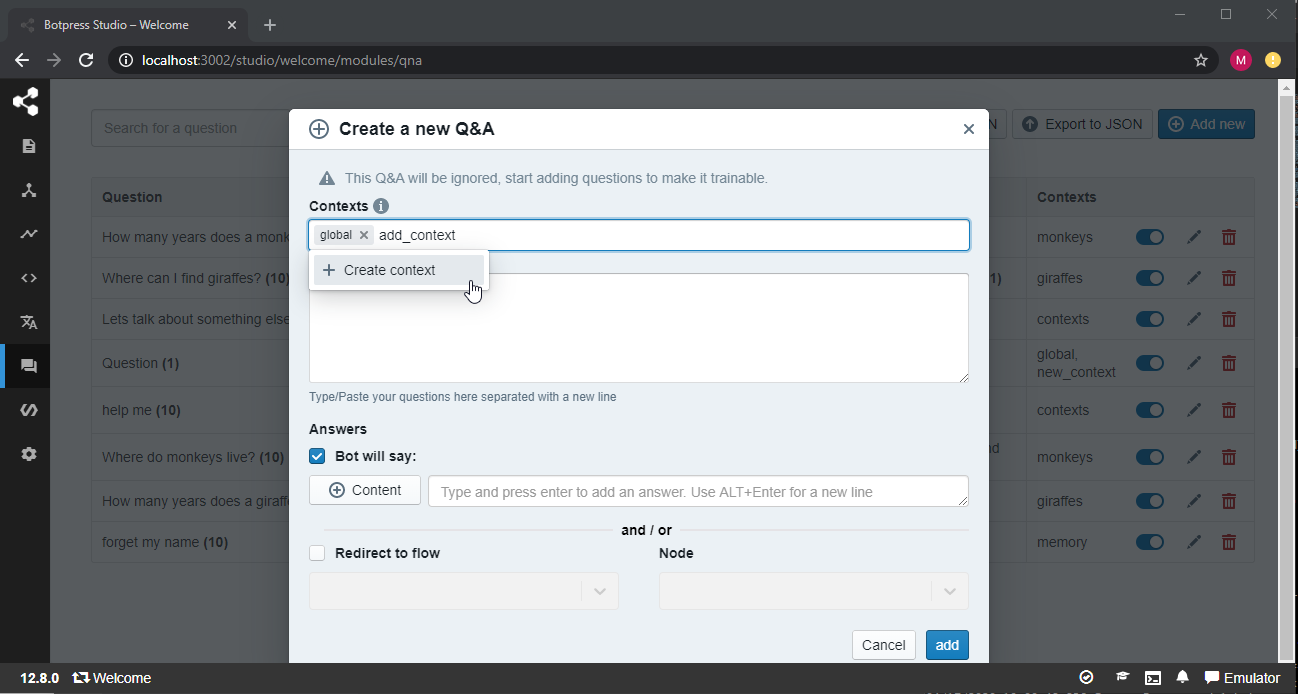
Category

When you create a new context this way, you need to save your changes for the context to be persisted.

Add a QNA

Once you have created your contexts, you can create your QNAs and assign a context to them. From the category menu, choose one of your contexts:
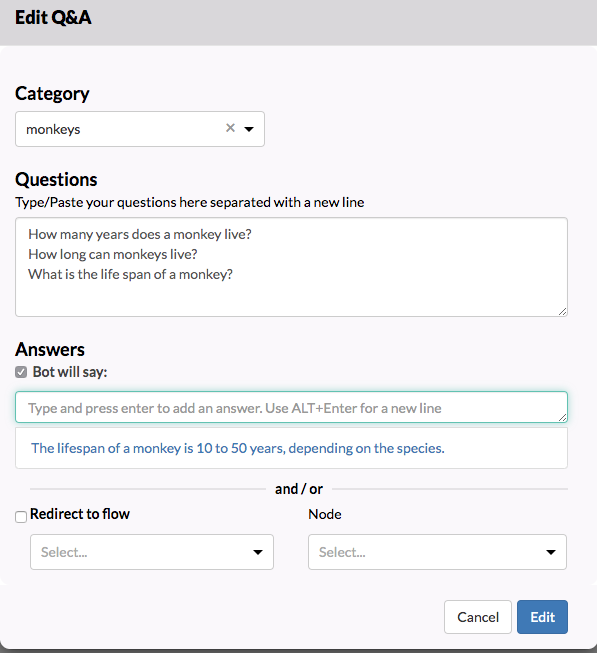
Category

Add contexts to your flow

The final step is to set the desired context at the appropriate time in your flow. To help you with this, we added 3 actions (i.e. appendContext, resetContext and removeContext). You will find these actions under the NLU category in your actions list.

Append Context

To set a context, let's use the appendContext action and add our new context in the contexts field. You can use comma-separated values to pass multiple contexts.
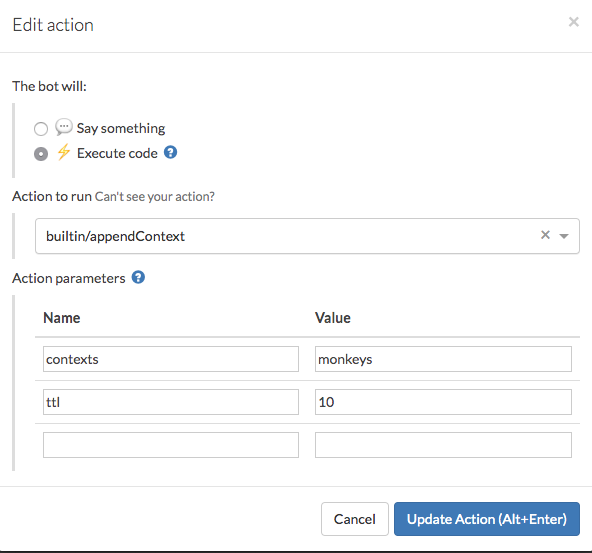
Actions

TTL

The TTL or Time-To-Live field is used to set a maximum number of interactions for this context to exists within a conversation.

Take Welcome Bot for instance. Its contexts have a TTL of 10. This means that someone can ask up to 10 questions about animals before the context is ignored. After the TTL expires, the bot will fallback to the global context.

← Inter-bot Communication / DelegationAuthenticate a user against a 3rd Party OAuth →
  • Create a context
    • From version 12.8 onwards
  • Add a QNA
  • Add contexts to your flow
    • Append Context
    • TTL
| Developers Guide
Docs
Getting Started (or other categories)Guides (or other categories)API Reference (or other categories)
Community
User ShowcaseStack OverflowProject ChatTwitter
More
BlogGitHubStar
Facebook Open Source
Copyright © 2021 Botpress Inc.